Customer Experience
How to Onboard Coaching Clients Effectively
April 18, 2026
13 min read

How to Onboard Coaching Clients Effectively
Onboarding coaching clients successfully is all about creating a smooth, organized start that builds trust and sets clear expectations.
Here’s a quick summary of how to do it right:
- Welcome Message: Send a personalized note that acknowledges their goals and provides essential resources and access to vetted review platforms.
- Discovery Session: Schedule an initial meeting to understand their needs and align on your coaching approach.
- Goal Setting: Use structured frameworks like SMART to define clear, measurable objectives.
- Communication Guidelines: Outline how and when you’ll communicate to avoid misunderstandings.
- Tools Walkthrough: Provide a simple guide or video to help clients navigate any platforms or resources.
- Regular Check-Ins: Schedule consistent follow-ups to track progress and maintain accountability.
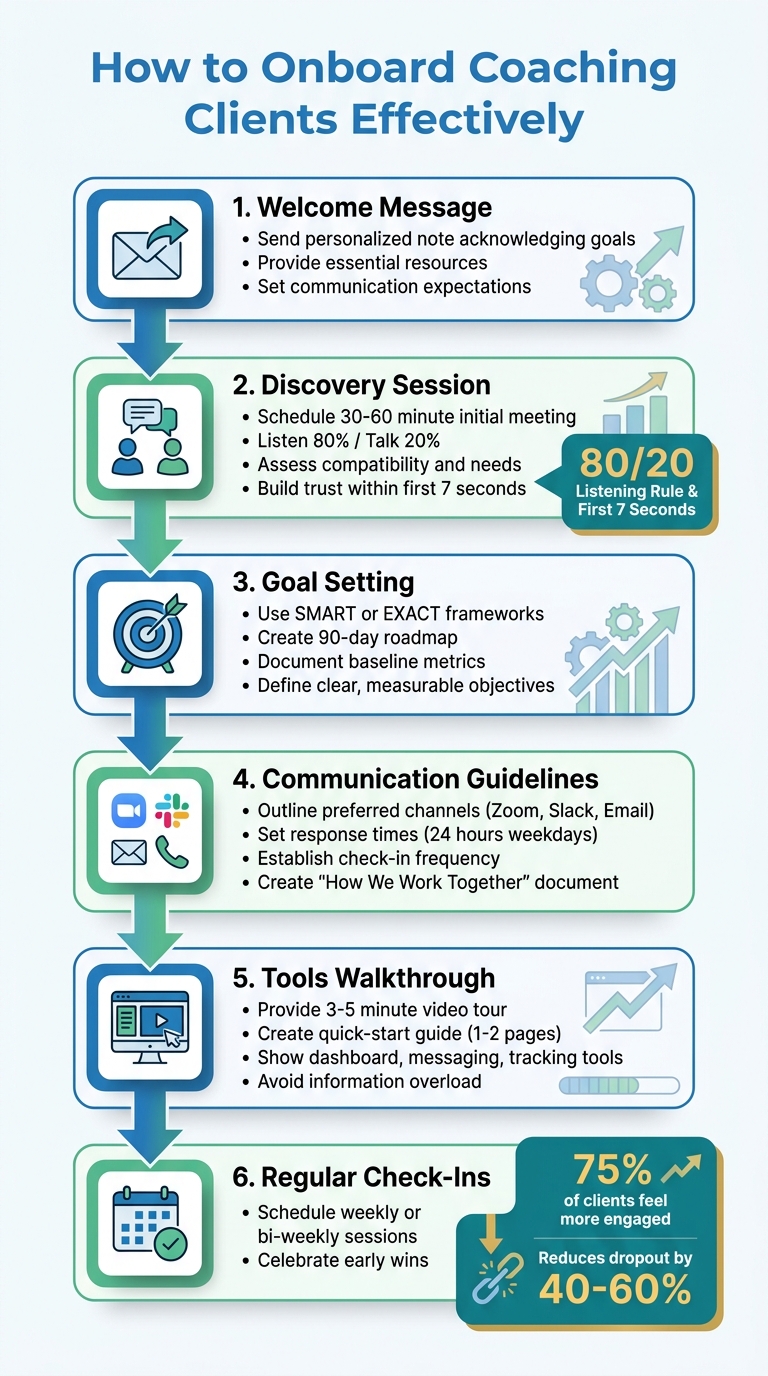
6-Step Coaching Client Onboarding Process
How to onboard a coaching client
sbb-itb-3c06305
Step 1: Send a Personalized Welcome Message
When a client signs up, they’re often excited but may also have lingering doubts. Sending a personalized welcome message right away can reassure them they’ve made the right choice. This initial communication sets the tone for your entire relationship, showing them you’re attentive and invested in their success. It’s the foundation for building trust that will carry through the onboarding process.
Write a Personal Welcome Message
Skip the generic templates. Instead, tailor your message by referencing details from your discovery call or intake form. For example, if a client shared that they want to lose 25 pounds before their daughter’s wedding in September, mention that specific goal. This shows you’ve been paying attention and immediately creates a sense of partnership.
As Faith Ola, Founder of FaithOla.com, puts it:
"Your welcome message is the right opportunity to ease their doubt and any concerns about investing in your services".
Make sure to reiterate the benefits of your services and explain how your approach aligns with their goals. Keep the tone warm yet professional - thank them for trusting you and express genuine enthusiasm about working together. After your personalized greeting, equip them with tools and resources to hit the ground running.
Include Helpful Resources
Follow up your welcome message with practical support. Offer direct access to essential resources and clearly outline the next steps. Provide links to the client dashboard, scheduling tools, and introductory materials like workbooks or tutorials for platforms such as Zoom or Slack. If you use multiple tools, consider creating a simple "Start Here" guide - a one-page document or a short video explaining how to navigate your resources.
Set clear communication expectations from the start. Let clients know which channels you’ll use (email, Slack, or Voxer), your office hours, and how quickly they can expect a response (e.g., within 24–48 hours on weekdays). This transparency minimizes confusion and helps you manage your time effectively.
Lastly, include a small, actionable resource to give them an early win. This could be something like a 5-minute breathing exercise or a habit tracker - something simple but impactful to build momentum.
For coaches using coachtrusted, the platform streamlines onboarding by integrating tools like the client dashboard and scheduling system, ensuring new clients can get started effortlessly.
Step 2: Hold an Initial Discovery Session
Once you've sent the welcome message, the next step is to schedule a 30–60 minute discovery session. This meeting is crucial - it sets the tone for your entire coaching relationship. During this time, you’ll assess whether your coaching style aligns with their needs, and they’ll decide if they feel comfortable enough to move forward with you. It's about building trust and understanding what truly motivates your client.
First impressions matter - big time. Research shows that people form their initial judgment about your professionalism within the first seven seconds of meeting you. That’s why preparation is key. This session is your chance to create a safe environment where clients feel comfortable sharing their challenges. It also helps establish clear expectations, which can prevent misunderstandings down the line. As the Co-Active Training Institute explains:
"A coaching discovery call is the first step in assessing compatibility and laying the foundation for a strong coaching relationship".
The secret to a successful discovery session? Listen more than you talk. Aim to spend 80% of the time listening and just 20% speaking. This isn’t the time to solve their problems; it’s about gaining a clear understanding of their life, motivations, and vision of success.
Now, let’s dive into how to prepare and structure this session for maximum impact.
Prepare for the Discovery Session
Start by reviewing the client’s intake form and profile. Dedicate just 10 minutes before the call to go over their responses carefully. Look for emotional cues in their language - phrases like “I’m tired of feeling stuck” or “I want to feel confident again” often hint at deeper motivations. If they’ve mentioned specific details, like running a business or training for an event, jot down a few targeted questions. This allows you to ask meaningful follow-ups instead of repeating what they’ve already shared.
Outline a simple agenda to keep things on track. Focus on three main goals: learning about their objectives and challenges, explaining your coaching approach, and discussing next steps. This structure ensures the conversation stays productive while still feeling natural.
Structure the Session
Breaking the session into four phases helps keep things organized and effective:
- Introduction (2–3 minutes): Start with a warm greeting, using their preferred name. Ease any nerves with an open-ended question, like “How’s your day going?” Then, briefly outline what you’ll cover during the call.
- Exploration (10–12 minutes): This is where you dig deeper. Ask thoughtful questions like, “What’s the biggest challenge you’re facing right now?” or “What would success look like for you in six months?” Use active listening techniques - reflect, paraphrase, and affirm - to show you’re fully present.
- Alignment (8–10 minutes): Explain how your coaching approach aligns with the needs they’ve shared. If you’ve helped clients with similar challenges, share those experiences (without turning it into a sales pitch). This phase is about setting expectations and showing how you can support them.
- Closing (5–7 minutes): Wrap up by proposing a clear plan, addressing any lingering questions, and explaining the next steps in the onboarding process. This ensures the client knows what to expect moving forward.
Here’s a quick breakdown of the session structure:
| Discovery Session Phase | Key Objective | Recommended Actions |
|---|---|---|
| Introduction | Build Rapport | Greet warmly; use their preferred name. |
| Exploration | Uncover Needs | Ask open-ended questions; practice active listening. |
| Alignment | Set Expectations | Share your coaching approach and clarify communication guidelines. |
| Closing | Define Next Steps | Propose a plan; explain onboarding and address final questions. |
Step 3: Set Clear Goals and Expectations
After gathering insights during your discovery session, the next step is to turn those findings into a well-defined plan. This plan should clearly outline goals and expectations, ensuring both you and your client are on the same page. Without this clarity, clients may feel lost or unsure of their progress, no matter how motivated they are.
The Co-Active Training Institute sums it up perfectly:
"A well-defined goal-setting process inspires transparency and collaboration, strengthening the trust in a coach-client relationship".
This step isn't just about identifying what your client wants to achieve - it's about creating a shared roadmap that keeps everyone aligned, accountable, and focused.
Documenting specific goals and expectations upfront helps clients understand what success looks like, how progress will be tracked, and when updates will occur. This level of organization not only prevents miscommunication but also reinforces the trust built during earlier sessions, setting the stage for long-term success.
Create a Shared Success Plan
To make goals actionable, use frameworks like SMART (Specific, Measurable, Achievable, Relevant, Time-bound) for performance-oriented objectives or EXACT (Explicit, eXciting, Assessable, Challenging, Time-framed) for emotionally driven ones. For example, instead of a vague goal like "get healthier", reframe it as: "lose 15 lbs. in 12 weeks by exercising four times per week and logging meals daily."
Start by recording baseline metrics - these could include body weight, revenue, or other relevant benchmarks. Break larger visions into smaller, monthly milestones with clear deadlines. This makes progress feel achievable and gives clients reasons to celebrate along the way.
Consider creating a 90-day roadmap that outlines realistic targets for the first 30, 60, and 90 days. Store this plan in a shared, easily accessible format - such as a Google Doc, client portal, or PDF - so both you and your client have a reliable reference point throughout the coaching process.
Once goals are set, establish a system for tracking progress and sharing updates regularly.
Define Communication Guidelines
To avoid confusion, set clear communication standards. A "How We Work Together" document can outline how and when you'll interact with your client. For example:
- Use Zoom for coaching sessions.
- Use Slack or Voxer for quick questions or support.
- Use email for administrative tasks like scheduling or billing.
It's also important to clarify response times. For example, you might commit to replying within 24 hours on weekdays while keeping weekends free for personal time. Clearly defining your working hours and availability ensures healthy boundaries and prevents misunderstandings.
As the team at Coached explains:
"Specificity is kindness. Clear expectations free clients from having to guess what you want".
Transparent communication builds trust and shows respect for your client's time. Here's a quick summary of best practices:
| Communication Element | Best Practice Recommendation |
|---|---|
| Response Times | Reply within 24 hours on weekdays; no weekend responses |
| Primary Channels | Zoom for sessions, Slack/Voxer for quick support, Email for administrative tasks |
| Check-in Frequency | Weekly or bi-weekly using standardized forms |
| Scheduling | Use self-service booking tools with integrated calendars |
Step 4: Show Clients How to Use Tools and Resources
Once goals are set and communication channels established, the next step is making digital tools simple and accessible. Ensuring clients can confidently use essential tools right away helps avoid early confusion. This guidance is a key part of delivering the personalized experience you introduced during onboarding.
The first 30 days are crucial. Research indicates that clients who feel supported and understand their tools during this period are far more likely to stick with their goals over the long term - at six months and even a year later.
The HubFit Team captures this idea perfectly:
"Onboarding isn't just about information transfer. It's about creating confidence."
Your goal here is to provide a clear, focused introduction to the platform and resources. Avoid overwhelming clients with every feature; instead, prioritize the essentials that will help them feel capable and in control from day one.
Give a Platform Tour
Start with a short, 3–5 minute video tour using tools like Loom or Zoom. Walk clients through key platform features, such as the dashboard, messaging system, goal-tracking tools, and resource library. To save time, record a general tour that can be reused with multiple clients.
Focus on the tools they’ll use most often. For example, show them how to log data like workouts or meals, send quick questions, and access their progress dashboard. If you’re using a platform like Coachtrusted, demonstrate how to navigate the client portal, book sessions, and find digital resources.
Here’s a quick breakdown of what to highlight:
| Feature Category | Priority Items to Show | Purpose |
|---|---|---|
| Communication | Messaging system, Slack/Voxer | Establishes clear ways to ask questions and get support |
| Scheduling | Booking calendar, Zoom links | Ensures seamless session scheduling |
| Content | Resource library, worksheets, videos | Provides immediate self-service tools |
| Tracking | Dashboards, habit/workout logs | Visualizes progress and keeps clients engaged |
After the tour, provide a written guide to reinforce what they’ve learned. This extra step ensures clients have something to refer back to as they get started.
Create Quick-Start Guides
Pair the platform tour with a concise, one- to two-page quick-start guide. Use bold headings, bullet points, and clear sections so clients can skim it in minutes. Include essentials like login details, Zoom links, a first-week checklist, and your tech support contact information.
To prevent information overload, take a phased approach. Share only the most vital details on Day 1 - such as how to access the app, book sessions, and message you. Save more in-depth resources, like nutrition guides or training glossaries, for later in the week. As ABC Trainerize puts it:
"In 2026, onboarding isn't just paperwork and welcome messages; it's a strategic first impression."
Store all guides and resources in a centralized client portal or an on-demand library. Automate access so clients receive everything as soon as they sign up. This not only builds trust in your process but also creates a seamless experience. To give clients an early win, include a simple task - like completing their profile or logging their first habit - to spark momentum right away.
Step 5: Schedule Regular Progress Check-Ins
After walking clients through the tools, regular check-ins are crucial for keeping things on track. These sessions help address issues early, maintain accountability, and show clients you're invested in their success. In fact, research reveals that 75% of clients feel more engaged when coaches provide consistent check-ins. Plus, a solid check-in process can cut early client dropout rates by 40% to 60%.
Finding the right timing is essential. Weekly or bi-weekly check-ins strike a good balance - they give clients enough time to apply new strategies while keeping accountability front and center.
Set Up Recurring Check-Ins
Once tools are in place, the next step is creating a consistent routine. Choose a specific day, like Monday or Friday, for check-ins and use automated reminders to reinforce the habit. This simple step can improve adherence by 20%. Platforms like coachtrusted make it easy to schedule these reminders and keep everything running smoothly.
Send a personal message around three days after onboarding to address initial concerns. HubFit emphasizes this in their onboarding script:
"I can only coach you if I have data. If you don't check in, I cannot make adjustments to your plan. The check-in is your responsibility; the adjustment is mine".
If a client skips a check-in, follow up manually within 24 hours to re-engage them and reduce the chance of them disappearing.
Recognize Early Wins
Once regular check-ins are established, it's important to celebrate progress to keep motivation high. Start each session by asking, "What was your biggest win this week?" This question encourages a positive mindset and helps clients see their achievements, even small ones. For clients facing weight loss or performance plateaus, shift the focus to non-scale victories like better sleep, steady energy, or sticking to their workout plan.
Use the "Sandwich Method" during check-ins: begin with praise, discuss areas for improvement, and end with encouragement. This approach sets a constructive tone for the week ahead. Tracking metrics like body composition, workout consistency, energy levels, sleep, and stress ensures there's always something to celebrate - even during tough weeks.
Conclusion
Onboarding isn’t just about ticking off administrative tasks - it’s the foundation of successful coaching. As Coached wisely notes:
"Specificity is kindness. Clear expectations free clients from having to guess what you want".
By sticking to a clear, step-by-step onboarding process, you establish trust right from the beginning. A warm welcome, a detailed discovery phase, and setting clear goals show professionalism and help ease any anxieties clients might feel after signing up. These actions combine to create a smooth start, reassuring clients they’ve made the right decision and setting the stage for meaningful progress.
The effort you invest in onboarding has long-term benefits. Clients who feel supported and understood are more likely to stay engaged, achieve their goals, and spread the word about your services. They’ll know how to communicate with you, what to expect from sessions, and where to access the tools they need.
Steer clear of common mistakes like overwhelming clients with too much information early on, leaving them without guidance after payment, or failing to clarify expectations around tasks and check-ins. Avoiding these pitfalls helps create a safe, supportive environment from the start - one where clients feel comfortable sharing challenges and celebrating milestones.
Tools like coachtrusted can make this process easier by automating reminders, centralizing resources, and simplifying scheduling. This allows you to focus on what truly matters: building strong relationships with your clients.
FAQs
What should I send right after a client signs up?
When someone signs up for coaching, it’s important to make a great first impression. Sending a personalized welcome message or email right away can help set the tone for your partnership. Use this opportunity to introduce the coaching process, outline what they can expect, and share any essential materials they’ll need to get started.
In your message, include key details like:
- Scheduling information: Let them know how to book their first session or access your calendar.
- Client portal access: If you use a portal, provide login details or instructions on how to use it.
- Initial assessments: Share any forms or questionnaires that will help you understand their goals and set a clear direction.
This thoughtful approach ensures your clients feel supported and confident as they begin their coaching journey.
How do I set boundaries without sounding rigid?
To establish boundaries without coming across as inflexible, focus on clear and respectful communication. Emphasize professionalism and mutual understanding in your approach. Position boundaries as tools for fostering a safe and productive coaching environment. Using consistent scripts or guidelines can help ensure your message is clear. Present boundaries as ethical principles that build trust, making them feel like a supportive framework rather than rigid rules.
What should I track in the first 30 days?
During the first 30 days of onboarding, it’s important to monitor a few key elements that contribute to a strong coaching relationship:
- How engaged the client is with initial communications and provided materials.
- Whether onboarding tasks, such as assessments and goal-setting, are being completed.
- How clear the expectations are and whether the client fully understands their goals.
- Any concerns, questions, or anxieties the client may share during this period.
- Early signs of retention and progress, which help build trust and keep motivation high.